1. Preparation
a. Client Consultation
- Ask about desired length, curl, and overall look design (light volume vs. dramatic).
- Assess the client’s eye shape and natural lashes to determine the best styling.
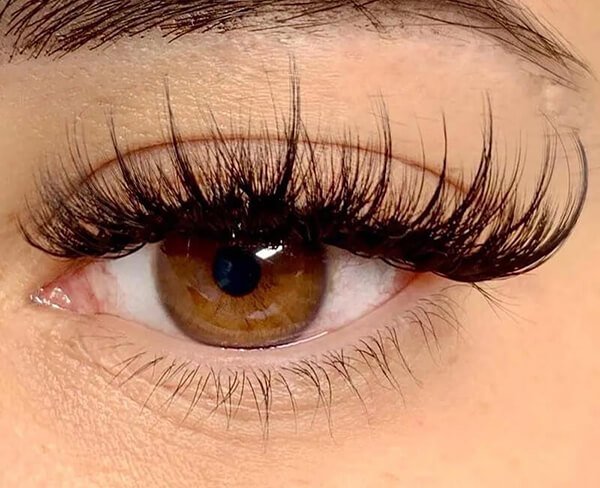
- Explain the wispy style: a mix of different lengths and spikes for a fluffy, textured application.
b. Sanitation & Setup
- Wash your hands and wear a face mask.
- Sanitize all tools.
- Prepare your lash tile palette with different lash lengths (e.g., 8 mm–15 mm) and curl types (mostly used C, CC, or D).
- Use premade spikes or create spikes manually using individual lashes.
c. Client Preparation.
- Have the client lie down comfortably with eyes closed.
- Clean the natural lashes using lash shampoo or a lash cleanser.
- Apply under-eye pads or tape to secure bottom lashes and lift the eyelid gently.
2. Lash Mapping Design (Wispy Style)
Create a lash map on the eyelid:
- Use a mix of shorter base lengths and longer “spikes” to create that wispy texture.
- Common map example (inner to outer corner).
- Mark spike zones with a different color on the pad for clarity.

3. Lash Isolation & Application
a. Isolate Natural Lash
- Use curved isolation tweezers to isolate one natural lash at a time.
b. Apply Lashes
- Dip the extension (classic or volume fan) into adhesive.
- For spike areas, use a closed fan or a slightly thicker lash (e.g., 0.07–0.10) to create the textured peaks.
- For surrounding lashes, use softer, thinner fans (e.g., 0.05) to fill in around the spikes.
- Apply in a layered pattern: top, middle, and bottom layers to add dimension.
- Maintain consistent direction and distance (0.5–1 mm from the lash line).
c. Recommended Products for Wispy Lash Application
Lash Extensions
- Lash Trays (0.03, 0.05, 0.07)—mixed lengths
- Recommend: Jemenow Lashes
- Premium Lash Extensions
- Premade Volume Fans
- Easy Fan Lash Extensions
- Ellipse Flat Lash Extensions
Adhesive
- Fast-drying glue (0.5s–1s drying time)
Tools
- Curved Isolation Tweezers
- Fine-Tip Volume Tweezers
- Silicone Lash Pad or Lash Tile for organizing lashes
- Nano Mister to cure adhesive
- Under-eye pads & low-tack tape
- Tweezers
- Lash Foam Shampoo
- Microfiber brushes & lint-free applicators
4. Mid-Set Check & Balancing
- Step back periodically to check for symmetry and balance between both eyes.
- Fill any gaps and ensure spikes are evenly distributed and not too heavy.
- Add extra short lashes if needed at the base to soften and blend the spikes.
5. Final Touches
a. Drying & Curing
- Use a nano mister or lash fan to cure the adhesive and eliminate fumes.
- Wait 2–3 minutes before having the client open their eyes.
b. Final Check
- Brush through lashes gently to ensure they’re not stuck together.
- Remove eye pads and tape carefully.
- Clean around the eyes if needed.
6. Aftercare Instructions
- No water, steam, or oil-based products for 24–48 hours.
- Avoid rubbing or pulling lashes.
- Clean lashes with a lash-safe cleanser every 2–3 days.
- Come in for a fill every 2–3 weeks to maintain the wispy look.
Bonus Tip:
Wispy sets are all about texture and layering. Varying lash lengths and precise spike placement make the look stand out—always work with control and intention for a clean, beautiful finish.

